Here’s another organizational tip from me, your GenX older cousin/uncool aunt who hates the word “edit” being used for “houseclean.”
My freezer is packed with chicken, eggos, and popsicles (add in Doritos and we have my own personal four food groups) so we don’t have room for conventional ice trays. I hate them anyway because they absorb freezer smell, take up too much space, and weirdly evaporate if you don’t use them right away.
We bought an inexpensive* countertop ice maker to make ice more accessible. It’s large and takes up too much space but now I’m addicted to having my daily Diet Dr. Pepper over fresh ice.
Something I did not expect was how DISGUSTING this thing gets. You’re going great, you’re having ice like the diva you are but one afternoon your ice goes from tasting like a clear polar stream to tasting like Legionnaire’s Disease and you find yourself going down a rabbit hole of hygiene hell.
I do not live in a dry environment, so any vessel that holds water is prone to growing mold. You’d think “but freezers prevent that!” Yes. But the water in the front part of these countertop makers isn’t being kept at a freezing temperature, and it stands until it needs to be used. That can quickly lead to very gross situations.
To clean this monstrosity, I take whatever ice is in the tray, stuff it into a freezer bag and toss it next to the ice cream sandwiches. Then I lug the ice maker to the sink, drain it (there’s a plug underneath just like larger coolers have), shoot hot water from the faucet all over the inside, and plug it back in until the mechanism opens to expose the little freezy parts. Then I immediately unplug it, because if I push OFF first, the mechanism will reset before powering down.
I fill a little bowl with soapy water and get to scrubbing.
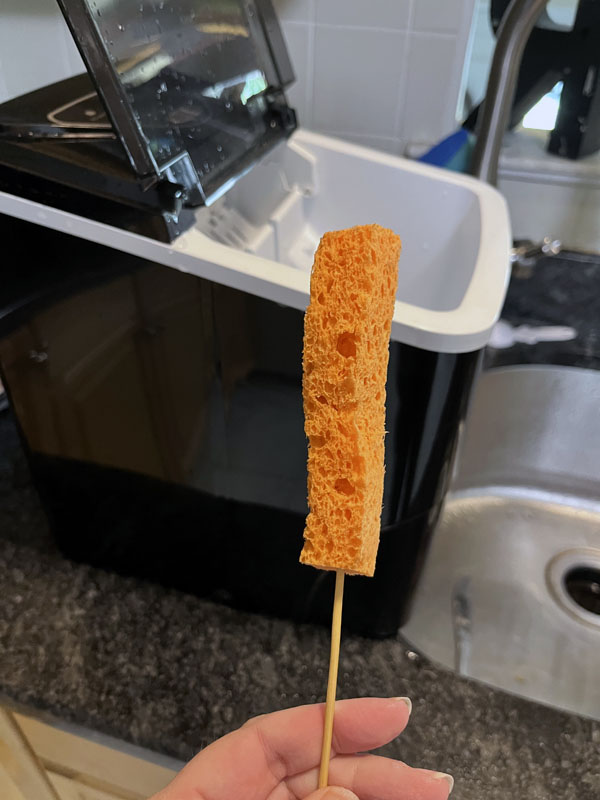
No normal sponge can reach deep into the back of the mechanism, so I improvise with a sliced sponge on a bamboo skewer.

You might see spots of mold on the little ‘cup’ that hides the freezy parts. You might see a light orange ‘film’ where the water stands. Or you might see nothing at all. When the scrubbing is done, plug it back up, plug it back in, fill it with equal parts of vinegar and water, and let it run some cycles. Discard that ice (unless you like vinegar ice, you do you) and fill it back up with water and you’re finished.
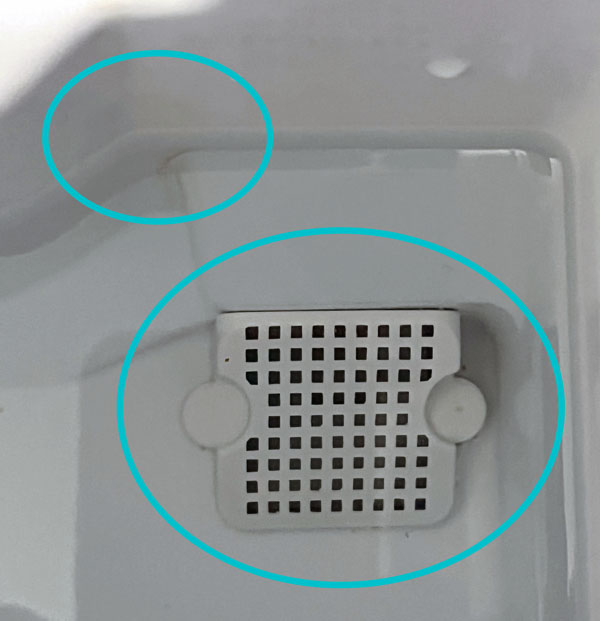
But the first time I cleaned this out, my ice cubes still tasted musty. I grumpily repeated the process and realized that there is a little plastic filter at the bottom of my water resevoir that keeps large objects from being sucked into the freezy compartment. In my ice maker, the plastic piece detaches so you can clean under it. Mold hides under there.

I circled the filter. It’s only about an inch square. I also circled the orange slime film.
Cleaning this takes about an hour. Thirty minutes to scrub to my satisfaction, and thirty minutes to let the vinegar cycle through. I do it once a month in the humid months, and every six weeks the rest of the year.
* aka NOT the $400 pebble ice maker you see all over Instagram
Need some more email in your life? If you’re a regular reader but forget to check in, you can subscribe to a once-a-week email with links to the week’s posts! Click here to sign up!


